


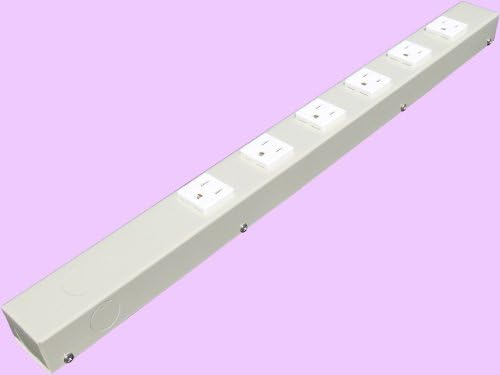


20 in Hardwired Power Strip, Beige, H02006NVG

 4.0 (106 items)
 Limited Time Sale
$18.59 cheaper than the new price!!
Free cash-on-delivery fees for purchases over $99
Product details
| Management number | 219023378 | Release Date | 2026/05/03 | List Price | $12.40 | Model Number | 219023378 | ||
|---|---|---|---|---|---|---|---|---|---|
| Category | |||||||||
This hardwired type power strip is good for installation in your kitchen, cabinet, on the rack and so on. Mount it where you want it to be. NO Power Cord and Plug on this unit. For single piece order in continental US address, flat shipping rate is charged. For multi items and q'ty, please contact us for combined shipping rates. We also ship to AK, HI, APO, AFP, FPO, MPO addresses, US Protectorates, offshore islands, and some foreign countries, such as Canada. Please contact us for details.
- 6 white/ivory vertical NEMA 5-15R receptacles. Outlet spacing: 1.30/2.28" or 33/58mm (center to center)
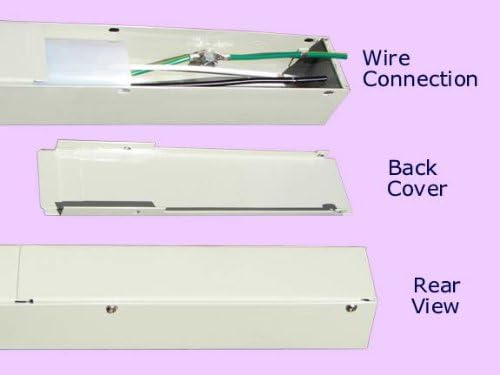
- 6 easily punched off Knockouts for cord exit on each side, top and bottom cover, both sides and ends. Easy on and off back cover
- Easy on/off back cover and wires readily stripped for faster connection
- Electrical Rating: 110-125V 60Hz, 15Amp, 1440W full load. ETL approved and listed (conforms to UL5 and CAN/CSA C22.2 No. 62)
- Mounting clips: 3/4" (19mm) spring steel mounting clips included
| UPC | 643749361423 |
|---|---|
| Brand | X1 |
| Color | Beige (not white) |
| Shape | Rectangle |
| Voltage | 120 Volts |
| Amperage | 15 Amps |
| Plug Type | Type B |
| Manufacturer | e-dustry, inc. |
| Model Number | EPS-H02006NVG |
| Maximum Current | 15 Amps |
| Mfr Part Number | EPS-H02006NVG |
| Number of Ports | 6 |
| Power Plug Type | No Plug |
| Number of Outlets | 6 |
| Compatible Devices | Hair Dryer, Set Top Box, Noise Maker, Freezer, Fax Machine, Modem, Iron, Tablet, Cellular Phone, Mixer Grinder, Microwave Oven, Gaming Console, Refrigerator, Smartwatch, Laptop, Projector, Radio, Air Conditioner, Television, Printer, Electric Fountain, Rice Cooker, Toaster, Lamp, DVD Player, MP3 Player, Home Theater, Light, E-Reader, Personal Computer, Smartphone, Router, Scanner, Speaker, Camera, Water Boiler, Monitor, Coffee Machine, Audio Sound System, Fan, Heater, Juicer |
| Enclosure Material | Alloy Steel |
| Surge Protection Rating | 1440 Watts |
| Recommended Uses For Product | Apartment, Cabinet, Indoor, Office, School, Side table, TV Cabinet |
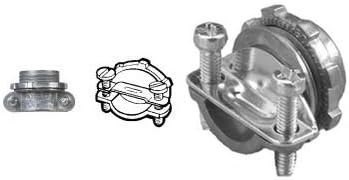
| Other Special Features of the Product | 1. Turn off electricity in the house;, 10. Match the color of the wires and secure the wire connection with proper wire connectors (different wire gauge use different colored wire connectors);, 11. Tighten the two pressure screws properly on the wire clamp connector;, 12. Place the plastic insulation sheet back in position in the power strip;, 13. Screw the Back Cover on, 15. Turn electricity back on, you are ready to go;, 14. Mount the power strip where you want it to be:, 2. Decide where to place this unit;, 3. Choose the side you want the cord exit to be and mark on the Knockouts coin;, 4. Gently punch off the Knockouts coin marked earlier with the back of a screw driver or other tool handy;, 5. Unscrew the Back Cover off the power strip with a philips screw driver;, 6. Take out the white plastic insulation sheet, then use the pair of scissors to cut a hole (about ¾" in diameter) on it for the wires to run through. (If the bottom knockout on the back cover will be used for wire connection, the hole should be in the middle of the sheet, then you will not need a wire clamp connector. Thus, please ignore step 7, 8 and 11 below);, 7. Put on the 3/8" wire clamp connector (Not included with the purchase) you already have in place. Secure the installation of the clamp connector by tightening the big ring screw (which should be the inside the wall, something like this) with the pair of slip joint pliers;, 8. Run the wires through the wire clamp connector, from the outside into the power strip;, 9. Please remember to run the wires through the white plastic insulation sheet (In case bottom knockout on the back cover is to be used for wire connection, please run the wires through the back cover first, now with the knockout coin punched off, from outside to inside);, A) For power strips with mounting tabs on both ends: screw down the unit on the floor, wall or in your cabinet or on your rack, where you want it to be;, Additonal Note:, B) For power strips without mounting tabs, but to be mounted with clips, place the unit where you want it to be first, make marks where to install the clips, which normally should be placed about 6" away from each end, and then screw the clips down with screws provided. Then, snap the power strip in on the clips, INSTALLATION GUIDE: |
Power Strips


Correction of product information
If you notice any omissions or errors in the product information on this page, please use the correction request form below.
Correction Request Form